
Preferences
General Preferences

Clip Panel
Choose whether or not Resolume should update the clip panel when a clip is triggered. You'll want to turn it off when you are for instance using an external source for triggering a sequence of clips (via MIDI, OSC or DMX for instance), while you are applying effects on another clip at the same time.
Clip Start Offset
The Clip Start Offset allows you to let a clip start an amount of milliseconds further into the timeline of the clip, to compensate for delays with MIDI triggering and/or long cable runs.
Scrolling
When this is checked, Resolume scrolls the deck to the clip or layer you just selected. Can be handy if you need to see that particular part of the deck. Can also be annoying if you were focused on another part of the deck. It's a matter of preference, really. Hence this toggle in the Preferences.
Font
The Arial Unicode checkbox changes the font used by Resolume. If you are using non-latin characters, and having trouble displaying them correctly please enable this.
Software Updates
Check this box if you want to get notified about new software updates once they are available.
Quit Confirmation
When Quit Confirmation in enabled, Resolume will wait for you to confirm your choice when you've decided to quit. With this disabled, Resolume will shut down immediately when you hit CTRL/CMD+Q or choose to quit via the menu.
Tip!! Turn off the Quit Confirmation in combination with the 'Trigger First Clip when Composition Has Loaded' function found in the Layer menu to use Resolume for fixed installations where the computer starts up and shuts down automatically.
Audio Preferences
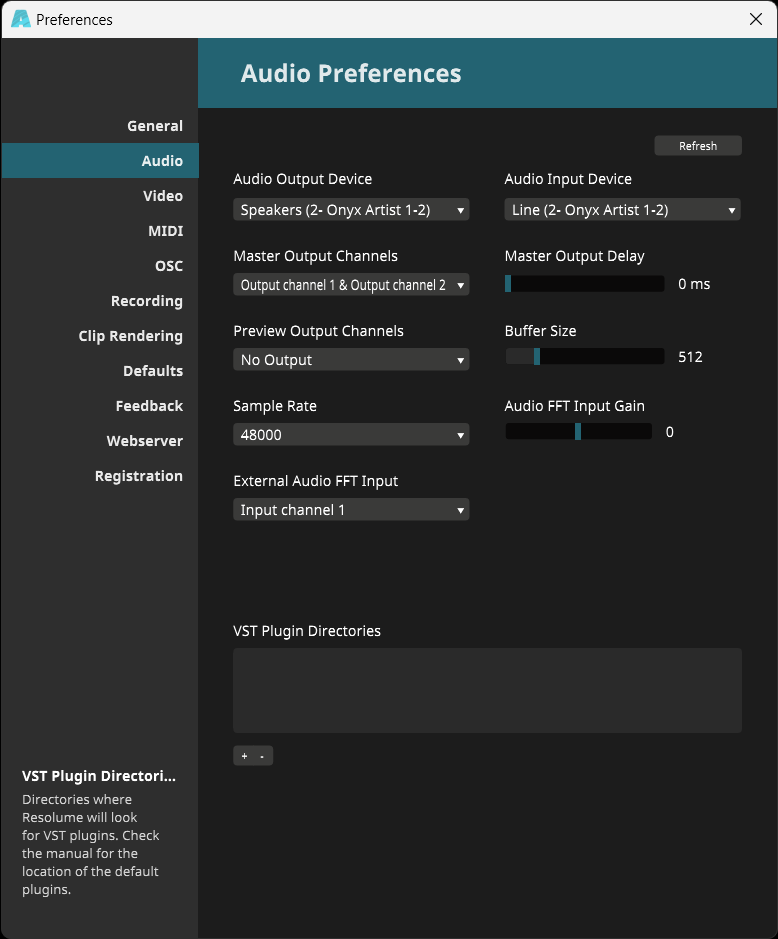 The audio tab presents you with options that control how audio should be output from Resolume.
Audio Output Device
Under Audio Output Device you can select the device that Resolume should use for audio output. If an ASIO device is selected, an extra button will be displayed that enables access to ASIO settings.
Output Channels
You can then select which channels should be used for the main output via Master Output Channels. If you are using an audio device that supports more than two channels, you can choose the channels used for monitoring the preview audio via Preview Output Channels.
Sample Rate
Higher sample rates provide higher quality audio but will require more processing, especially if audio effects are in use. 44100 is a good choice.
Buffer Size
Higher buffer sizes will introduce more latency into the system but setting the buffer size too low may cause glitches in the audio. 512 or 1024 are usually safe choices.
Audio Input Device
Similar to selecting the output device, here you can select which device Resolume uses for all incoming audio.
Audio FFT
Under External Audo FFT Input you can the channels that should be used for external audio analysis. You can boost the gain if the signal is coming too low.
Tip! You can also set the FFT gain in the main interface via View > Show FFT Gain
SMPTE
On Arena, you can select which channels to use for your source of SMPTE sync. You can read all about this in the SMPTE chapter.
VST Directories
VST Plugin Directories are the directories (folders) that Resolume should look in for VST audio effects and sources.
Video Preferences

FFGL Directories
On the Video tab, you can select the directories that you want Resolume to look in for FFGL effects and sources.
Resolume always checks the Extra Effects folder in the user's Documents. For a hassle free plugin setup, install custom plugins there. They will then load automatically on the next startup.
If you're using Juicebar, it will also add an entry here for their plugins.
DMA Textures
This is a very nerdy setting. You can use it to change how Resolume sends your pixels from your computer's hard drive to the graphic card.
The recommended setting is Force ON. This is also the default. Only if you are experiencing performance problems on older or lower end GPUs, should you switch to Force OFF.
Autodetect is a legacy setting. It fails to detect the correct setting in a lot of cases, so that's why we recommend to just force it on.
MIDI Preferences
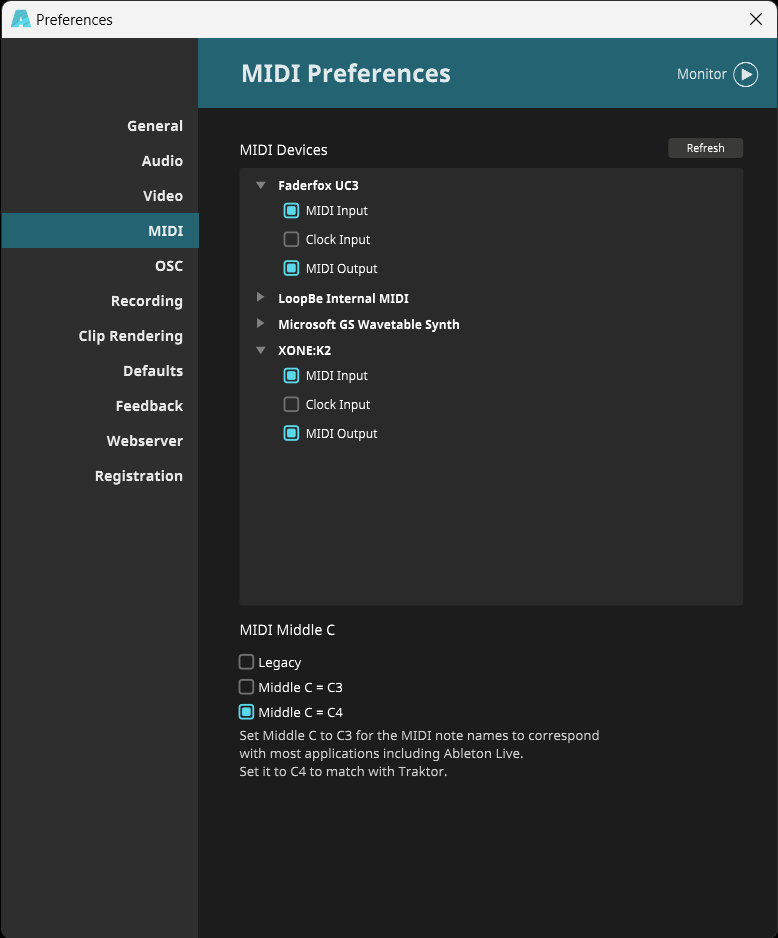
MIDI Devices
Here you can enable or disable MIDI input and output from and to devices. Check the Midi chapter for all about input, clock and output.
If you click the monitor-icon in the top-right you can pop-up the MIDI monitor, sit back and watch all your incoming and/or outgoing MIDI messages.
Middle C
This will let you decide which note is used to display the Middle C.
Behind the scenes, MIDI doesn't actually use musical notes, just numbers. Middle C refers to note number 60. To make this more confusing, every application has a different idea on what musical note this actually represents.
Ableton Live uses C3, Traktor uses C4.
This doesn't actually change anything in your MIDI shortcuts. It just changes how the the shortcut is displayed in Resolume. It makes sense that when you're working with several applications, at least you're using the same notation.
OSC Preferences
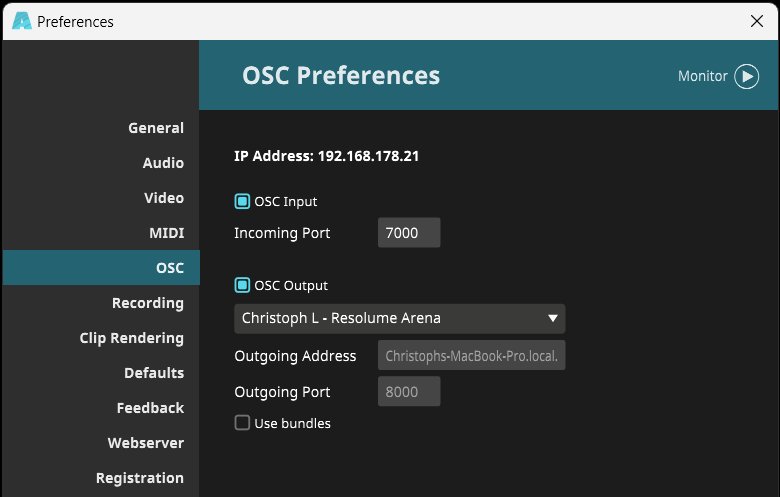 Here you can enable or disable OSC input and output, as well as set the relevant ports and IP addresses used by OSC.
With the monitor-icon in the top-right you can quickly see all incoming and/or outgoing OSC messages.
For more info check the section on controlling Resolume with OSC.
DMX Preferences
The DMX preferences tab is available on Arena only.
You can read all about setting up Lumiverses and Art-Net nodes in the DMX chapter of the manual.
Keep in mind! The Network Adapter switches both Art-Net input and output to the selected adapter!
Recording
Here, you can set the directory that Resolume will use to store video recordings and still image snapshots. You can also choose whether to record Video and/or Audio and what codec you want.
See the section on Recording for details on how this works.
Clip Rendering
In this tab you can set a custom output directory for all your renderings made with the clip renderer and set the codec details you prefer.
See our Clip Renderer article for more details.
Defaults
 This section allows you to change several default settings to be used when importing files or creating a new composition.
Default Transport and Play Mode
Whatever you choose here, will be the default setting for files that you import from that moment on.
So for instance, if you always use your video clips on BPM Sync and 'play once and eject', you can choose these as the default settings.
You can choose different settings for video and audio. AV files or videos with a (silent) audio track will use the settings for audio.
Note that this does not affect clips that were already imported. Also you can still change this setting for individual clips after importing as well.
Default Blend Mode
Choose which Blend Mode newly created layers will use.
Tempo Nudge Range
When nudging the BPM up or down, this sets what percentage of the current BPM it shifts the BPM up or down with.
10% is good when doing actual audio stuff. Personally I think 25% is more suited when syncing visuals to music.
You know, this is not actually a default setting. It's not applied as a default for anything. It's a personal preference, so it should go in the General Preferences. But that page was pretty full. So we put it here. I guess that is how we roll sometimes.
Feedback
 Here you can contact us to tell us how much we suck. Or how awesome we're doing. Or a bit of both.
Either way, we always love to hear from you.
Webserver
Activate the Webserver and REST API and set the correct port and address.
If you have no idea what this is about check out our REST API & Webserver article.
Registration

Read all about making your Resolume legit and how to switch your license between computers in the Registration chapter.