
Effekte
Effekte sind fantastisch! Alles, was in Resolume läuft, lässt sich mit Effekten manipulieren. Das gesamte Audio und das gesamte Video.
Genau genommen ist jeder Effekt ein kleines Programm, welches das Audio oder Video auf bestimmte Weise verändert und mit verschiedenen Parametern gesteuert wird. Man schickt diesem Programm das gerade laufende Material, lässt es entsprechend den vorgenommenen Einstellungen bearbeiten und erhält das Ergebnis in Resolume zurück.

Resolume enthält standardmäßig mehr als 100 Video-Effekte und zudem eine Handvoll elementarer Audioeffekte! Wenn Ihnen das nicht reicht, erfahren Sie weiter unten, wie man noch mehr Effekte hinzufügt.
Effekte anwenden
Sie finden alle Effekte auf dem Effekte-Tab unten rechts auf dem Interface.
Um die Vorschau eines Effekts zu sehen, doppelklicken Sie im Browser auf seinen Namen. Er wird in der 'Vorschau Ausgang' angezeigt und auf das in der Komposition gerade laufende Material angewandt. Dann können Sie dessen Parameter feineinstellen, um den gewünschten Look zu erhalten.
Wenn Sie den richtigen Effekt für den richtigen Moment gefunden haben, ziehen Sie ihn einfach aus dem Effekte-Tab auf den Bereich des Kompositions-, Ebenen- oder Clip-Tabs, der mit „Effekt oder Maske hier ablegen“ gekennzeichnet ist, oder Sie legen den Effekt direkt auf einem Clip oder einer Ebene ab.

Tipp! Halten Sie beim Ablegen eines Effekts die ALT-Taste gedrückt, um ihn mit ganz zurückgedrehter Deckkraft anzuwenden. So können Sie seine Parameter feineinstellen und dann langsam in den Mix einblenden.
Clip-Effekte werden auf den einzelnen Clip bei seiner Wiedergabe angewandt.
Ebenen-Effekte werden auf jeden abgespielten Clip der jeweiligen Ebene angewandt, nachdem dessen Clip-Effekte angewandt wurden.
Kompositions-Effekte werden auf die endgültige Ausgabe angewandt, nachdem die Ebenen zusammengemischt wurden.
Man kann alle Effekte vorübergehend umgehen (B-Schalter) oder entfernen (X-Schalter).

Wenn Sie ein Resolume Effekt-Ninja sind und bereits den Namen des gesuchten Effekts kennen, können Sie seinen Namen in die Suchen-Box am oberen Rand des Effekt-Browsers eingeben.
Tipp! Drücken Sie STRG-/ (oder CMD-/ beim Mac), um die Box zu fokussieren und nicht zur Maus greifen zu müssen.
Warum die '/' Taste? Na ja, das ist wie STRG-?, nur ohne die SHIFT-Taste.
Audio-Effekte
Je nach Effekt können Audio-Effekte beliebig viele Parameter haben. Aber einen haben sie alle gemeinsam. Der „Dry/Wet“ Slider steuert den Anteil an bearbeitetem Signal, das dem Originalsignal beigemischt wird.
Wenn man diesen Parameter ganz nach rechts schiebt, hört man nur das Effektsignal und kein Originalsignal. Schiebt man ihn ganz nach links, ist der Effekt nicht mehr hörbar.
Video-Effekte
Ähnlich wie Audio-Effekte verfügen auch alle Video-Effekte über mindestens zwei Parameter – Deckkraft und Überlagerung. Mit ihnen kann man den Effekt mit dem originalen Video mischen. Wie beim Mischen von Ebenen können unterschiedliche Kombinationen von Überlagerung und Deckkraft zu unterschiedlichen Ergebnissen führen.
Um ganz sicher nur den resultierenden Effekt zu sehen, wählen Sie die Alpha-Überlagerung und drehen die Deckkraft ganz auf.
Leider ist dieses Handbuch zu kurz, um zu beschreiben, was jeder Parameter jedes Effekts bewirkt oder wie man ihn einsetzt. Sie sollten die Effekte einfach selbst ausprobieren und die Regler bewegen. So werden Sie schnell herausfinden, welche Sie besonders mögen. Einige unserer persönlichen Favoriten sind: Vignette, Hue Rotate, Stingy Sphere, PolkaDot, Goo und Particle System.
Masken

Masken sind eigentlich Effekte, die Transparenz in einem Bild erzeugen. Beispiel: Basierend auf den Pixeln in einem Standbild rendert Resolume bestimmte Teile des Contents unsichtbar.
Um eine Maske zu erzeugen, zieht man den Mask-Effekt auf ein Panel und lädt mit dem Button Laden... eine Bilddatei. Man kann ein Standbild auch direkt auf ein Panel ziehen.
Nach dem Laden kann man via Kanal-Dropdown-Menü entscheiden, wie man Transparenz erzeugt.
'Luminanz' ist voreingestellt. Das heißt: Überall dort, wo das Maskenbild schwarze Pixel enthält, wird der Content transparent. Überall dort, wo das Maskenbild weiße Pixel enthält, bleibt der Content sichtbar. Grauwerte bedeuten 'halbtransparent' usw.
Indem man Kanal auf Rot, Blau oder Grün einstellt, verwendet Resolume die R-, B- oder G-Werte des Pixels anstatt der allgemeinen Luminanz.
Bei der Option Alpha verwendet Resolume den Alphakanal des Maskenbilds zur Erzeugung von Transparenz.
Man kann die Maske mit Umkehren natürlich auch invertieren.
Wenn das für die Maske verwendete Bild eine andere Auflösung als der Content hat, wird das Bild gestreckt und angepasst.
Sie würden gern beweglichen Content für Ihre Maske verwenden? Werfen Sie einen Blick auf den Layer Mask Modus.
Transformieren
Transformationen sind das wichtigste Tool zum Komponieren von wunderschönen Bildern. Häufig bringt das Skalieren des richtigen Contents mehr für die Ausgabe als dominierende Effekte wie Kaleidoscope.
Da Transformationen so wichtig sind, bekommen Sie in diesem Handbuch eine eigene Seite.
Vorlagen
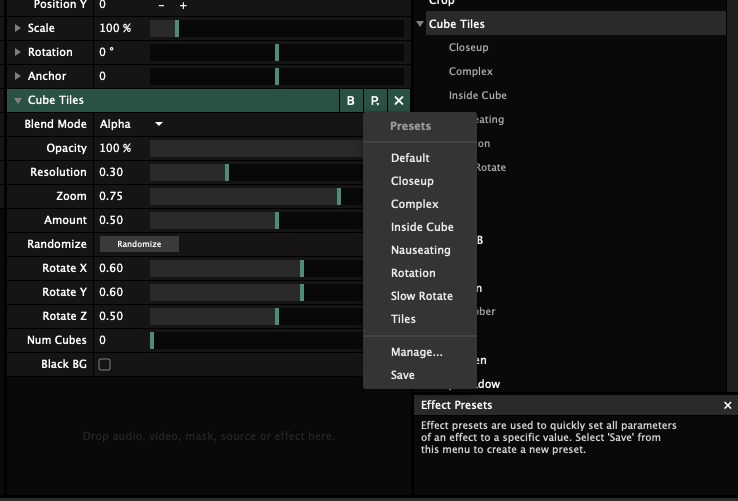
Alle Effekte unterstützen das Erstellen von Vorlagen. Jede Vorlage enthält alle Einstellungen eines Effekts, damit sie diesen schnell mit den gewünschten Einstellungen aktivieren können.
Um eine Vorlage zu erstellen, stellen Sie den Effekt zuerst so ein, wie er funktionieren soll. Drehen Sie an den Reglern, bis die Ausgabe perfekt ist. Dann wählen Sie das Vorlagen-Aufklappmenü über den Effektparametern und klicken darin auf die Option „Speichern unter“. Es erscheint das 'Vorlagen verwalten' Fenster, in das Sie einen Namen eingeben und die Vorlage mit dem Speichern-Button sichern.
Die neue Vorlage erscheint jetzt in der Effekt-Liste unter dem Namen des eigentlichen Effekts. Um eine Vorlage anzuwenden, ziehen Sie sie auf die gleiche Weise wie einen Effekt auf die Komposition, die Ebene oder den Clip.
Man kann sich Vorlagen wie einen großen Oktopus vorstellen. Viele Leser denken jetzt vielleicht an Hentai, aber der Vergleich macht schon Sinn, wie Sie gleich sehen werden.
Beim Anwenden einer Vorlage nimmt der Oktopus mit allen Tentakeln gleichzeitig die gewünschten Parameteränderungen vor. Danach schwimmt er wieder weg. Der Effekt erinnert sich nicht, mit welcher Vorlage die aktuellen Einstellungen vorgenommen wurden. Ihm ist es sogar egal, ob es der Oktopus war oder Sie alles manuell eingestellt haben. Wenn Sie dann eine Vorlage aktualisieren, werden die anderen Effekte, die auf diese Vorlage eingestellt waren, nicht mitaktualisiert. Der Oktopus kommt nur einmal vorbei und verschwindet dann wieder in einer Tintenwolke.
Macht noch immer keinen Sinn? Okay, ich hab‘s versucht. Dann ganz kurz: Mit einer Vorlage kann man die Parameter eines Effekts schnell auf bestimmte Werte einstellen. Es werden nicht alle Effekte auf die gleichen Werte eingestellt.
Effekt Bypass animieren
Man kann auch den Effekt Bypass-Schalter animieren. Wenn Sie auf das B Icon rechtsklicken, erhalten Sie ein Menü mit allen regulären Optionen zur Parameteranimation. So kann man beispielsweise einen Effekt zum Beat ein- und ausschalten.
Mehrere Effekte
Bisher haben wir nur über das Anwenden eines Einzeleffekts gesprochen. Aber man kann beliebig viele Effekte anwenden und so lange weitermachen, bis ein matschiger Haufen hässlicher Pixel entsteht oder der Computer in Flammen aufgeht.
Man kann Effekte stapeln, indem man mehr als einen an der gleichen Stelle ablegt. Hierbei werden die Effekte, beginnend mit dem obersten im Slot, nacheinander angewandt. Jeder Effekt wirkt auf den Ausgang des vorherigen Effekts.
Man kann die Reihenfolge der Effekte ändern, indem man den Effekt an seiner grünen Kopfzeile nach oben/unten schiebt.
Durch Umstellen der Effektreihenfolge kann sich die resultierende Signalausgabe dramatisch ändern. Beispiel: Sie wenden zuerst den PolkaDot- und dann den Radar-Effekt auf einen Clip an. Das sieht cool aus!
Aber achten Sie auf den Unterschied, wenn Sie den Radar- über den PolkaDot-Effekt ziehen!
Der Unterschied ist subtil, aber extrem wichtig!

Zuerst PolkaDot, dann Radar.

Zuerst Radar, dann Polkadot.
Tipp! Transform ist ein Effekt wie alle anderen. Also kann man Transforms überall im Render-Stapel unterbringen.
Bonus-Tipp! Da Transform ein Effekt wie alle anderen ist, kann man auch eigene Vorlagen für ihn speichern.
Effekte umbenennen

Manchmal lädt man den gleichen Effekt mehrmals für unterschiedliche Zwecke. In diesem Fall kann man eine Effektinstanz nach Bedarf neu benennen, indem man den Effektnamen rechtsklickt und 'Umbenennen' wählt.
Effekt-Clips

Man kann auch einem leeren Clip Effekte hinzufügen. Dadurch erzeugt man einen Effekt-Clip. Wenn Sie auch mit Photoshop oder After Effects arbeiten, kennen Sie diese Funktion unter dem Namen 'Einstellungsebene'.
Alle auf einen Effekt-Clip angewandten Effekte werden auf alle Clips angewandt, die auf darunterliegenden Ebenen abgespielt werden. Auf diese Weise kann man sehr schnell eine Sequenz unterschiedlicher Looks und Effekte erzeugen und weiterhin das Footage „im Flug“ austauschen.
Sie können Effekten sogar MIDI- oder Tastatur-Trigger zuweisen und mit der Ebenen-Überblendung von einem Effekt zum anderen überblenden.
Wie den Quellen kann man auch den Effekt-Clips eine Dauer zuweisen und sie mit dem Autopilot verwenden.
Mehr Effekte
Die in Resolume integrierten Effekte sind sehr mächtig und sollten eigentlich fast alle Ihre Anforderungen erfüllen. Aber vielleicht benötigen Sie doch noch mehr Effekte. Im Audiobereich unterstützt Resolume VST Plugins. Im Videobereich unterstützt es FFGL Plugins.
Beginnen Sie Ihren Trip durch externe Plugins am besten an der Juice Bar.
In unserem Forum gibt es einen Thread, der Links zu Plugins für VJs bereitstellt. Für Resolume 6 und höher muss das Plugin mit 64 Bit kompiliert sein.
Um das Plugin eines Drittanbieters zu laden, kopieren Sie die .dll (PC) oder .bundle (Mac) Datei in den 'Extra effects' Unterordner in Resolumes Documents-Ordner. Starten Sie Resolume neu und Ihr Plugin wird automatisch geladen. Bei Bedarf können Sie einen eigenen Ordner hinzufügen, der beim Start durchsucht wird.
 Bei VSTs können Sie auch einen eigenen Ordner hinzufügen, der nach VSTs durchsucht wird.