10-Bit Color Output
More and more LED panels, screens, processors and projectors can display 10-bit color.
A 10-bit per channel signal can represent up to 1.07 billion distinct colors, compared to 16.7 million for 8-bit.
In practice, this means less color banding, so gradients in skies, beams and fades appear smooth instead of stepped.
Note that 10-bit color is not the same as HDR: you’re still working in a normal SDR color space, just with more steps between dark and bright values.
While 10-bit workflows are still rare on stages and live events, they’re increasingly required in broadcast and virtual production.
In this article, we’ll show you how to set up a 10-bit workflow in Resolume.
Composition
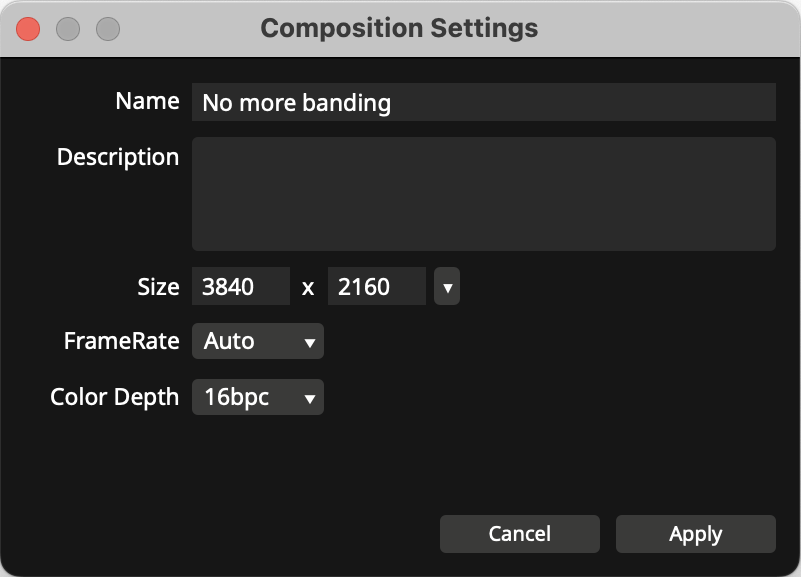 Setting the bpc (bits per channel) in the composition settings
In Avenue and Arena, you will need to change the Color Depth of your composition from the default 8 bpc to 16 bpc. Setting your composition to 16 bpc ensures Resolume processes colors with enough precision to take advantage of a 10-bit output.
You can find this option under Composition → Settings → Color Depth.
Content & Codecs
When creating VJ content, we recommend working in 16-bit and exporting to an Apple ProRes 422 codec for playback in Arena & Avenue.
The DXV codec is 8-bit and not designed for a 10-bit pipeline.
For still images, use 16-bit PNG or TIFF.
10-bit or higher video codecs | 16-bit image formats | 16-bit texture sharing |
✅ ProRes 4444 | ✅ 16-bit PNG | ✅ NDI ✅ Spout ❌ Syphon |
*H.265 / HEVC – can be transcoded in Alley, but does not play back correctly.
Note that not all of your content needs to be encoded above 8-bit.
You can play 8-bit clips just fine in a 16-bit composition.
Reserve Apple ProRes 422 for content with smooth gradients where you actually see banding in 8-bit.
For fast-moving, noisy, or highly textured video you won't notice the difference between 8- and 10-bit, so choose your weapons wisely: DXV is still much faster to play back than ProRes 422.
Sources, both native and Wire-based, will run at the bit-depth set in the composition settings.
Hardware
Resolume can process your colors in 16-bit, but whether you actually see the benefit depends on your hardware chain. Every link between your GPU and the LED wall, projector or screen has to be able to carry a 10-bit signal: the graphics card, the connector, the cable, any splitters or processors, and finally the display itself. If any of these only support 8-bit, the whole chain effectively falls back to 8-bit or uses tricks like dithering or chroma subsampling to cope.
So before you start debugging your content or composition, make sure your displays, LED processors and projectors really support 10-bit input at the resolution and refresh rate you want to run.
Connectors
The physical connector and the underlying standard determine how much data you can push: higher resolution + higher refresh rate + 10-bit color all require more bandwidth.
For a reliable 10-bit pipeline, use one of these:
DisplayPort 1.2 or newer
HDMI 2.0 or newer
Thunderbolt 3 / 4 (when carrying DisplayPort video)
USB-C with DisplayPort Alt Mode
Older standards like DVI, VGA, or early HDMI revisions are often limited in bandwidth and may either not expose 10-bit modes at all, or only at lower resolutions and refresh rates. If you’re going into LED processors or switchers, check their documentation too: some will accept 10-bit over one input but down-convert or limit it internally.
Cables
Even if your GPU and display both support 10-bit, an under-specced cable can silently force the link to drop down to a lower bandwidth mode.
General guidelines:
DisplayPort: Use a certified DisplayPort 1.4 cable. These are designed for high-bandwidth modes (up to 8K@60Hz with 10-bit color).
HDMI: Use a Premium High Speed HDMI cable or Ultra High Speed HDMI cable (for HDMI 2.1 devices). Avoid no-name “HDMI 1.4” or very long cables unless you know they handle the required bandwidth.
On long runs to front-of-house or stage, consider that extenders, converters (HDMI-to-SDI, etc.) and matrix switchers may introduce their own bandwidth limits. If 10-bit modes don’t show up in your GPU settings:
Test with a short, direct cable from GPU to display.
Bypass any splitters, scalers or converters.
Try a lower resolution or refresh rate to see if 10-bit becomes available.
If it works directly but not through your show rig, the bottleneck is somewhere in that chain.
GPU
Once your physical chain is capable, you need to tell the GPU to actually output 10-bit.
How you do this depends on the GPU architecture and operating system.
NVIDIA
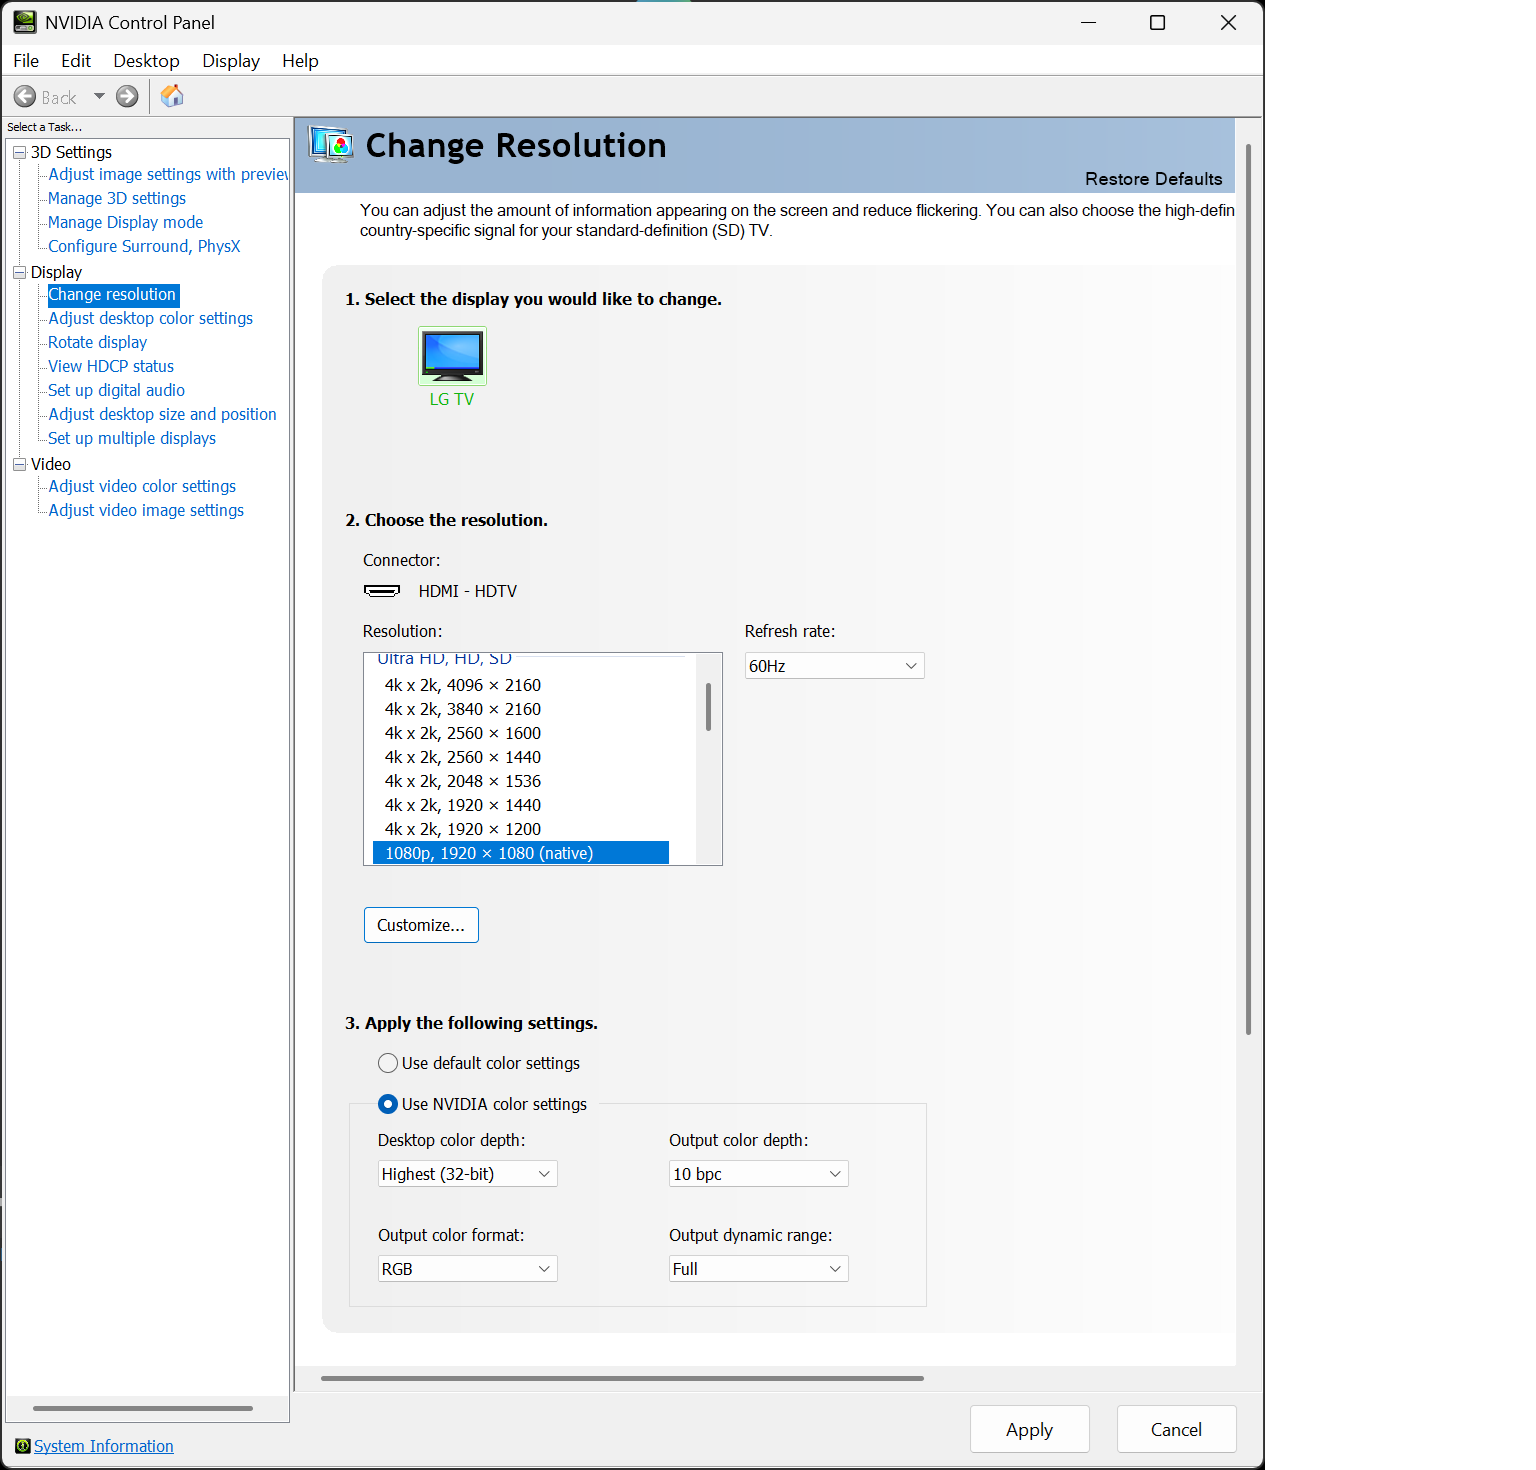
Open NVIDIA Control Panel.
Go to Display → Change resolution.
Enable Use NVIDIA color settings.
Set:
Desktop color depth: SDR (30-bit color) or Highest (32-bit) — not 24-bit.
Output color format: RGB
Output dynamic range: Full (always use Full, even for 8-bit workflows).
Output color depth: 10 bpc
Note that depending on your display and cable used 10-bit might not be available on all resolutions and refresh rates. You may need to reduce resolution and refresh rate before output color depth can be set from 8 bpc to 10 bpc.
AMD
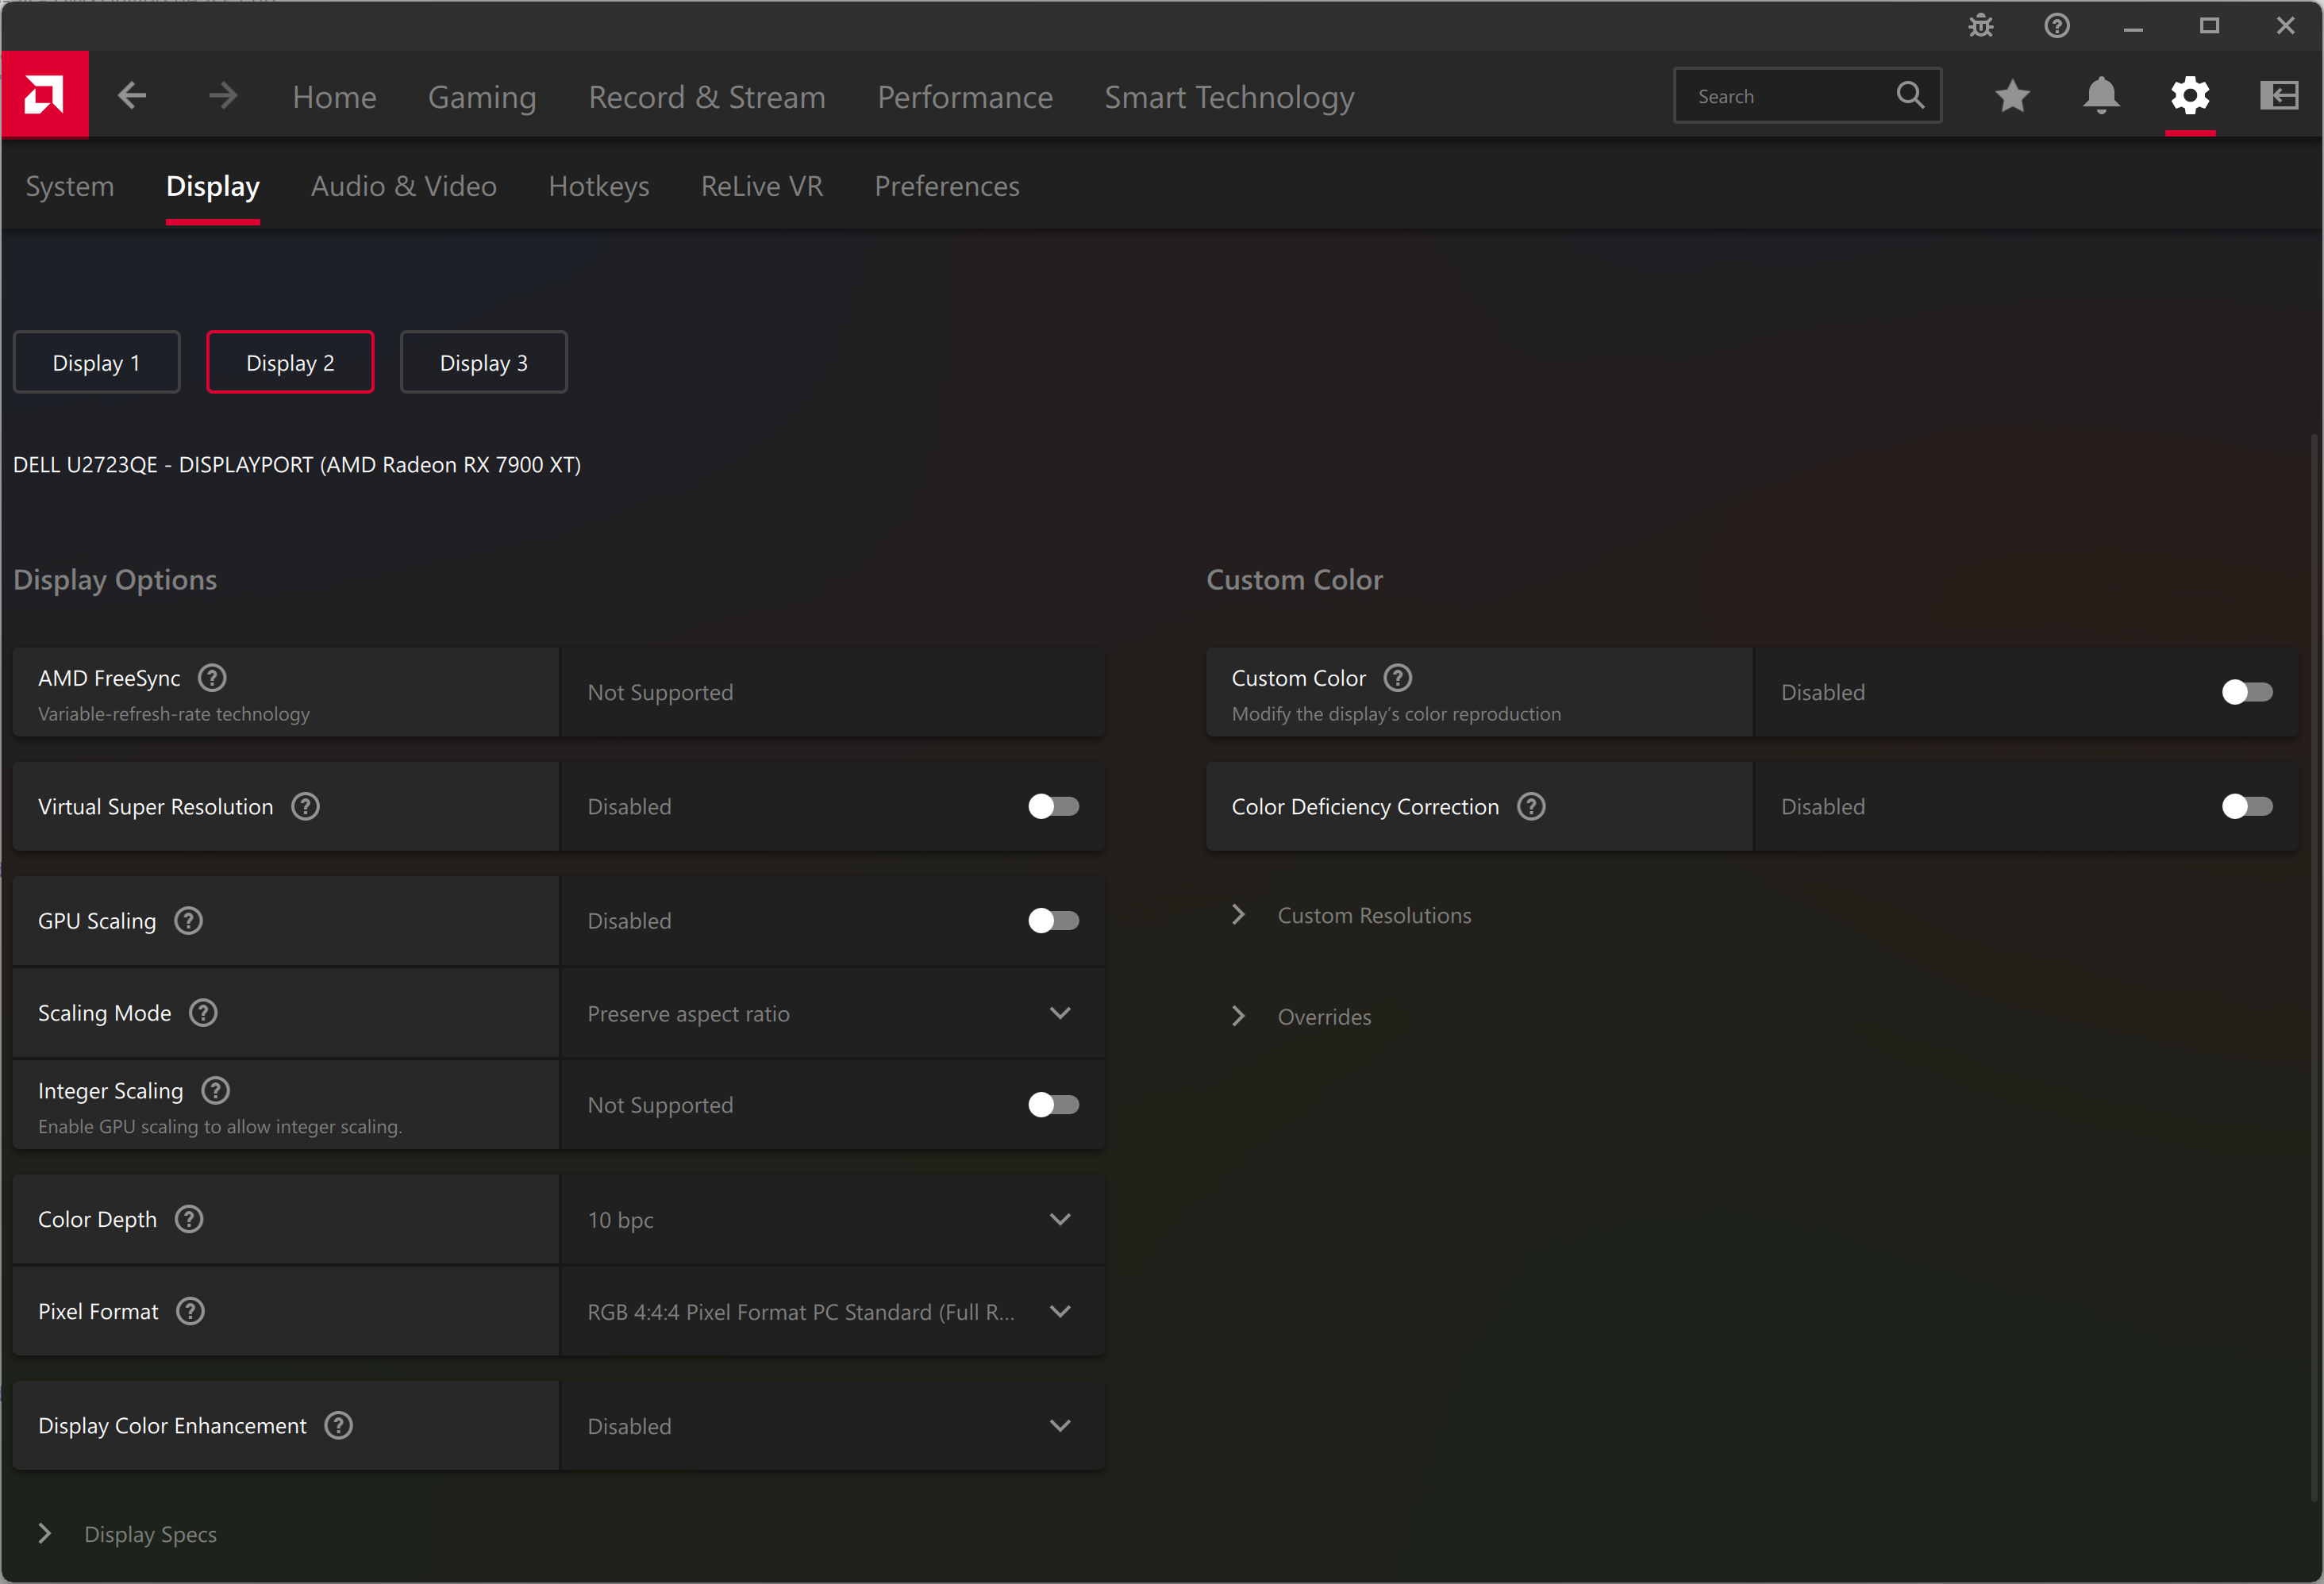
Open AMD Software: Adrenalin Edition.
Go to Settings (cogwheel) → Display.
Select the display you want to configure.
Set:
Color Depth: 10 bpc
Pixel Format: RGB 4:4:4 (Full Range) (always use Full, even for 8-bit workflows).
MacOS
On macOS 10-bit output works if your display supports it, no need to configure anything in the display settings.
Testing
Once your composition, content, GPU and cabling are all configured, it’s time to check whether you’re actually seeing the benefit of 10-bit in the real world.
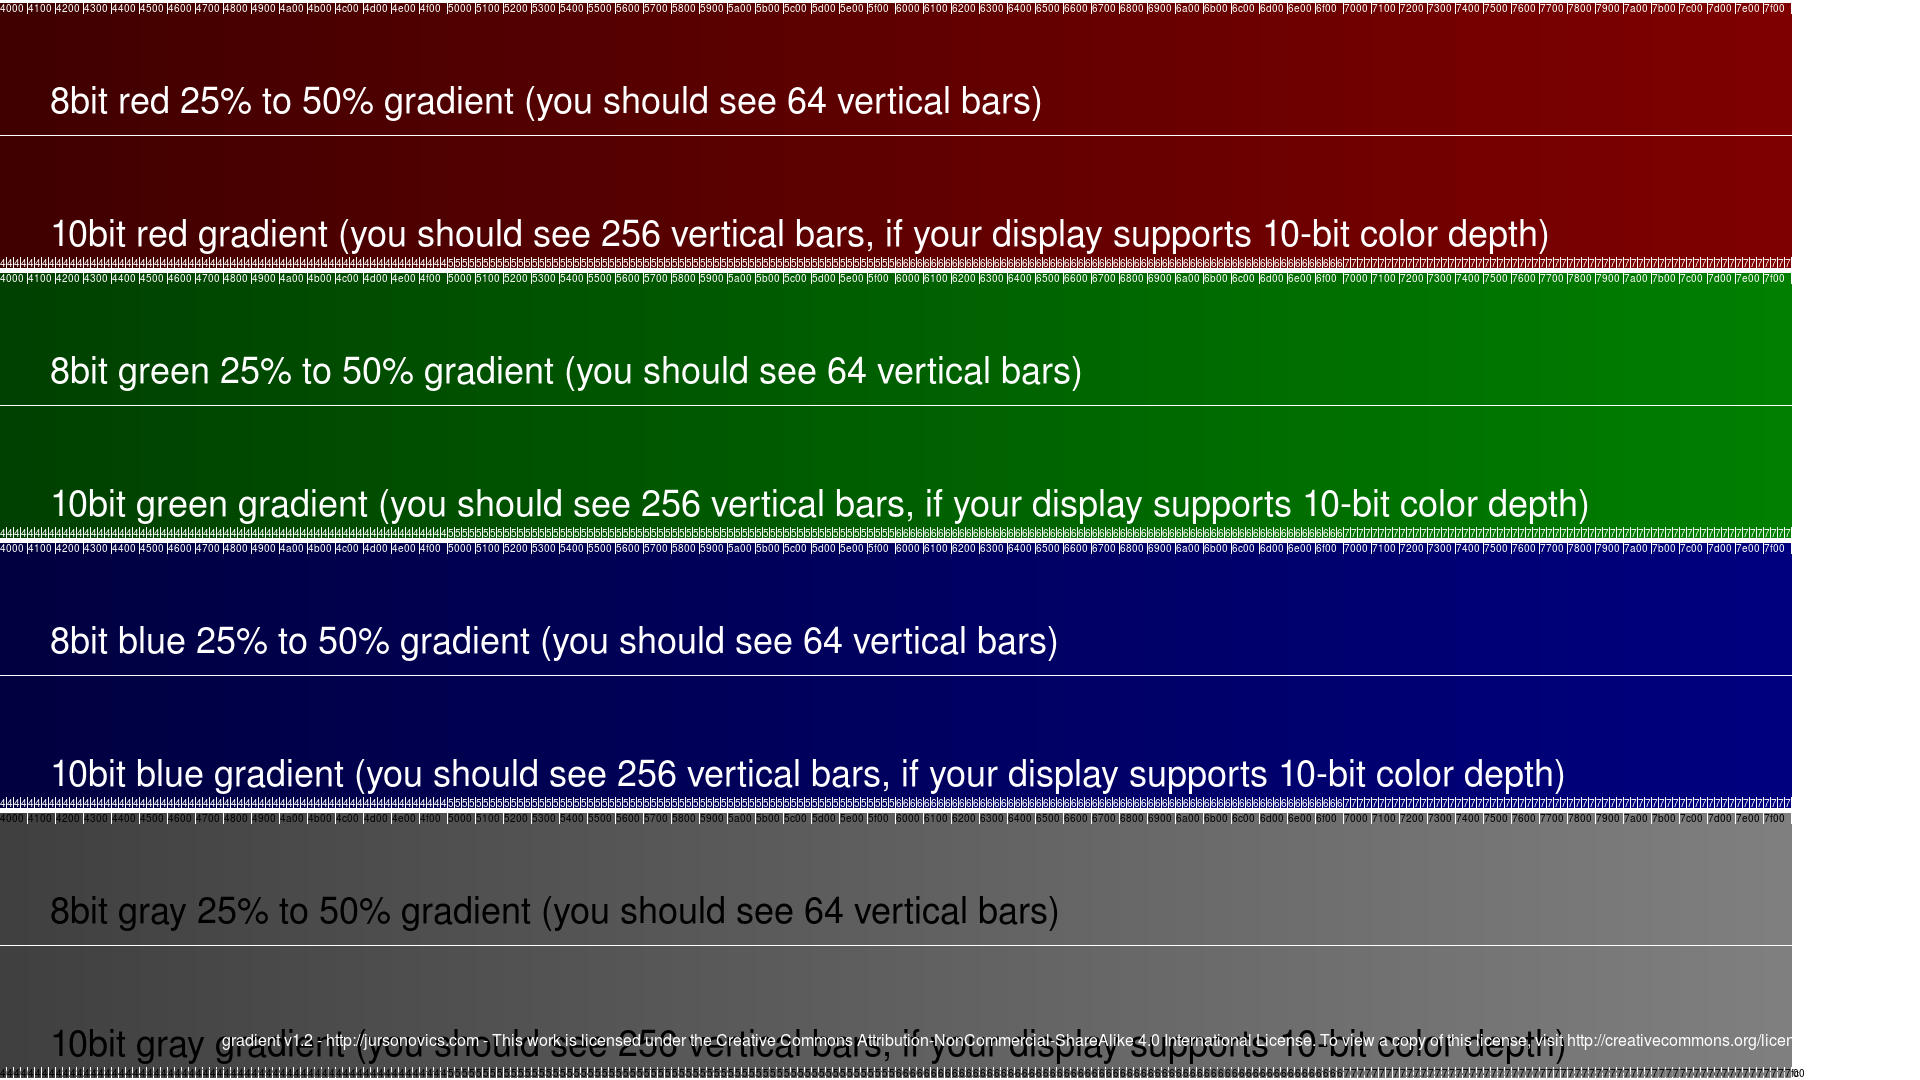
Prepare a few simple test clips that really expose banding:
- Linear gradients (black→white, dark blue→light blue, dark red→orange).
- Radial “spotlight” gradients fading to black.
- A sky or fog/haze shot.
- The test image below.
Export the same content twice: once as regular 8-bit (e.g. DXV or 8-bit PNG) and once using a 10-bit capable format (e.g. ProRes 422/4444 or 16-bit PNG/TIFF), then load both into a 16 bpc composition in Resolume.
When testing, look specifically at the gradients and fades: on the 8-bit version you’ll often see visible “rings” or steps in skies, beams, flat color areas and slow fades to black.
On the higher-bit version, those steps should be much softer or disappear, with a smoother, more continuous transition.
If both versions look equally banded, it’s a sign that somewhere in your chain (GPU settings, cables, LED processor or display) you’re still effectively running in 8-bit.