Off the Shelf Lab
I'm going to assume that we already have some media that we want to play on our little LED Screen.
Let's begin by setting up Resolume 6 by creating a custom Advanced Output setup for our pixel map. The first thing we need to do is create a bunch of custom fixtures for our LED Matrix Screen. Resolume lets you create any variation of layouts using its Fixture Editor.
Fixture Editor
Inside Resolume, click on Application, and select Fixture Editor.

The Fixture editor is split into 3 panes.
Fixtures
A list of all your fixtures, you can add and remove them at will, rename them etc
Fixture Parameters
This pane allows you to set parameters for the fixture you are editing. Things like what kind of channels it will have, the width and height of your pixel array, its direction, color space etc
Pixels
A visual and numerical representation of the fixture we create.
Our 14 x 14 pixel matrix has a total 196 pixels. If you remember how many channels a single DMX Universe has, you will know that we can not fit this matrix into one DMX universe as we can only fit 170 pixels worth of RGB data into 512 bytes!
The PixLite splits each Universe into 510 usable channels (discarding 2 so there is no overlap).
Our pixel map for this simple matrix will consist of 4 fixtures to accommodate this.
Here is the layout of our matrix, note each colour block is an independent fixture: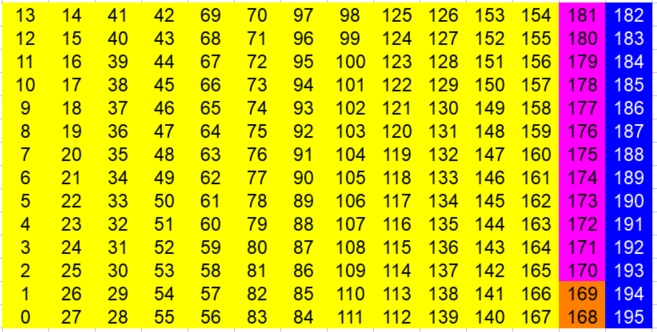
| Fixture Name | Universe | Number of Pixels | Start Px | End Px |
| Matrix_P1of4 | 1 | 168 | 0 | 167 |
| Matrix_P2of4 | 1 | 2 | 168 | 169 |
| Matrix_P3of4 | 2 | 12 | 170 | 181 |
| Matrix_P4of4 | 2 | 14 | 182 | 195 |
Custom Fixtures
Clicking on the "+" button in the Fixtures panel, creates a new fixture for us. Scroll down to it on the left pane and double click on it to rename it. The first fixture will be named "Matrix_P1of4"
Let's go over the Fixture Parameters for this fixture.
Width & Height
This allows us to set the width and height of the fixture. We will set this one to 12 pixels wide by 14 pixels tall
Color Space
The color space attribute tells Resolume how to organise each pixels colour data and in what order the colors appear. Our pixels have RGB leds inside BUT, and this is a big BUT, the actual order the LEDs translate data sent to them can vary from pixel models. We are fine to use RGB.
Gamma
We can leave this as is at 2.5
Distribution
Probably the most important attribute, this tells Resolume the physical placement of each pixel. Our panel is oriented so that the 1st pixel is at the bottom left corner, data then flows up, turns RIGHT to the next row, DOWN, then RIGHT then UP etc... as indicated by the icon we have selected.
Now let's create the other 3 fixtures. Note the different Width & Height attributes for each and the different Distribution of pixels by matching their pixel order in the table above.
Matrix_P2of4: Width 1 Height 2 Distribution UP
Matrix_P3of4: Width 1 Height 12 Distribution UP

Matrix_P4of4: Width 1 Height 14 Distribution DOWN

Now that we have our custom fixtures set up click Close to save them!
Pixel Map
The next step is to insert them into the Advanced Output of Resolume, adjust the virtual mapping and position over your actual media.
Back in the main window of Resolume, click on the Output Menu and select Advanced...
Click on the Presets menu at the top left and click on New to get the same blank layout. Note the colour gradient I have in the screenshot is the media I have selected. Its a simple shader called "Gradient" that is included with Resolume.
Next we need to Add a new "DMX Lumiverse". Resolume treats a Lumiverse as 1 DMX Universe with a unique DMX Universe ID and Subnet ID. Each Lumiverse can have a maximum of 512 channels, just like a regular DMX Universe. Click on the big "+" icon on the top left and select "DMX Lumiverse"
Next we need to remove the "Screen 1" section from the layout. We are setting up a DMX output only system and don't need anything other outputs for this demo. Click on "Screen 1" and click on the "X" to remove it from the layout. You will be left with "Lumiverse 1".
By default, when you create a new Lumiverse, it adds whatever fixture you were last working with. If it's not the correct one, click on it on the left panel and select the correct one form the drop down on the bottom right. The first fixture we need is "Matrix_P1of4":

Next we insert our 2nd fixture into the same Lumiverse. Click on the big "+" icon on the top left and select insert DMX Fixture. Once inserted, set this fixture to be "Matrix_P2of4" On the FIXTURE attribute at the bottom right:
At this point we have exhausted all 510 channels for this Universe and need to create a second one for the rest of the panel.
To make it easy, simply right click on Lumiverse 1 and duplicate it. It will create a duplicate Lumiverse and duplicate Fixtures. You will then need to change the fixtures in the second Lumiverse to "Matrix_P3of4" and "Matrix_P4of4" like so:

In the Center panel you can click on any fixture and move it around to position it onto the screen in any way you like. The screencap above has all 4 fixtures split so you can see what I'm doing.
We need to do two things: push them together to resemble the 14x14px panel and resize them to scale so that our map is appropriately projected from our media.
Let's talk about scale. I want to make sure that each physical pixel is represented by 50 onscreen pixels wide and 50 onscreen pixels tall. Lets change each fixture's scale as follows:
| Fixture | Screen Pixels Per Physical LED | Virtual Fixture Width | Virtual Fixture Height |
| Matrix_P1of4 | 50 | 12 x 50 = 600px | 14 x 50 = 700px |
| Matrix_P2of4 | 50 | 1 x 50 = 50px | 2 x 50 = 100px |
| Matrix_P3of4 | 50 | 1 x 50 = 50px | 12 x 50 = 600px |
| Matrix_P4of4 | 50 | 1 x 50 - 50px | 14 x 50 - 700px |
You can adjust each fixtures width and height by clicking on the fixture and using the Width and Height attributes on the right panel:

Lastly we put all the fixtures together to resemble the perfect 14x14 matrix, You can click and drag each fixture into place. Resolume has built in object snapping to make alignment easier as well, it's the MAGNET icon at the top of the screen:

We are almost done. The last step is to assign each Lumiverse to a Unique Universe ID. Click on "Lumiverse 1" and on the right hand panel make sure it says Subnet 0 Universe 0. Then click on "Lumiverse 2" and set that to Subnet 0: Universe 1
The PixLite4 MII LED Driver
In this section we will go through all the steps required to connect the driver to your pixels, power and the network. To configure it to receive appropriate data and to set it up to talk to your pixels correctly.
Hardware
- Advatek PixLite4 MkII LED Driver
- 14px x 14px SK9822 Addressable LED Matrix. This will come with a 4 pin data cable and a 2 pin power cable
- 240V Mains 5V 300W Switching Power Supply. You will need an GPO male plug cable to connect mains power and a short cable to connect 5V rails
Software
- Advatek Assistant software to set up the controller
Notes on Networking for this lab
The PixLite has a single Ethernet port that is used to received data from Resolume. In order to get the best possible performance and easiest set up, out of the box, we need to have our network set up properly. Here is a simple diagram of what we need to achieve: I will be using a relatively cheap consumer grade WIFI Enabled Router made by TP-LINK. You can use any router you like, as long as you have DHCP enabled and have 2 spare Ethernet ports on the LAN side of the device.
You can connect your laptop to the router using WIFI however your performance will drop depending on the quality of WIFI you have set up. If you have Ethernet ports use them!
Hardware Setup for the PixLite

The PixLite has 4 output ports and can support thousands of pixels in total. However we are only going to use one port for simplicity.
Once you have everything connected and powered up, download the Advatek Assistant software and run it. Once opened click on the Search button to find your PixLite.

If you have everything hooked up properly, you should see the PixLite in your list.
Configuration
Double click on it and it will open up the configuration dialog. Here is a description of each Tab and what we need to do:
Network
This tab allows you to control the PixLite network system. We will leave this untouched for this demo
Control
This Tab hosts all the nitty gritty stuff details about how Resolume's data is received, processed and sent to the pixels
LEDs
This tab will allow us to tell the PixLite what type of pixels we are using, their data rate, colour preferences etc
Test
This tab allows us to test that the pixels are correctly plugged into the board, we will use this as a 1st run test
Misc
This tab is for advanced settings and firmware update
LEDs
The first thing we need to do is tell the PixLite what kind of pixels we are using and set up all the settings so its working properly. Click on the LEDs tab and set everything as follows:
Pixel IC
This sets the pixel type, we are using the SK9822
Clock Speed
This is the rate at which the controller talks to the Pixels. For this demo we can set this to the maximum which is preferred
RGB Order
The SK9822 pixels protocol expects color data in the order RGB
Control
Next we set up how the PixLite interprets the Art-Net data that Resolume sends and how it then translates it to the panel we are using.
Click on the "Control" tab. In the Ethernet Protocol select "ArtNet" and then tick the "Advanced" tick box and click Advanced:

In the advanced settings, we will configure how the data is interpreted. We only need to configure Output 1. We can ignore all the other outputs for this lab. Set Output 1 to the following

Start Universe
Our fixture set up starts at Universe 0 in Resolume. PixLite starts counting at 1, so this should be set to Universe 1.
Start Channel
We start at Channel 1
End Universe
Our fixture set up ends at Universe 1 in Resolume. This is Universe 2 in the PixLite. It will be automatically set for us when we enter the number of pixel sin our set up.
End Channel
This is automatically set for us when we enter the number of pixel sin our set up.
Num Pixels
The total number of pixels on our matrix panel is 14 x 14 = 196
NULL Pixels
We can leave this at 0 as the PixLite has its own voltage level converter
ZIG ZAG
Not used
Group
Not used
Intensity Limit
Useful if you want to limit the total power output of your pixels to use less power
Reversed
Not used
Now click OK, and exit the application. The device is now ready to go. We now need to enable output in Resolume to the PixLite and start playing our content.
Enabling Output in Resolume
Open Resolume and go to the Advanced Output. For this demo we are going to be using the "Broadcast" method to send data to the PixLite. For large installations where you have many controllers and many more pixels, its best to use "IP Address", which will use Unicast.
Click on "Lumiverse 1" and on the "TargetIP" attribute on the right select "Broadcast", do the same for "Lumiverse 2".
At this point you will see your content appear on your matrix display!