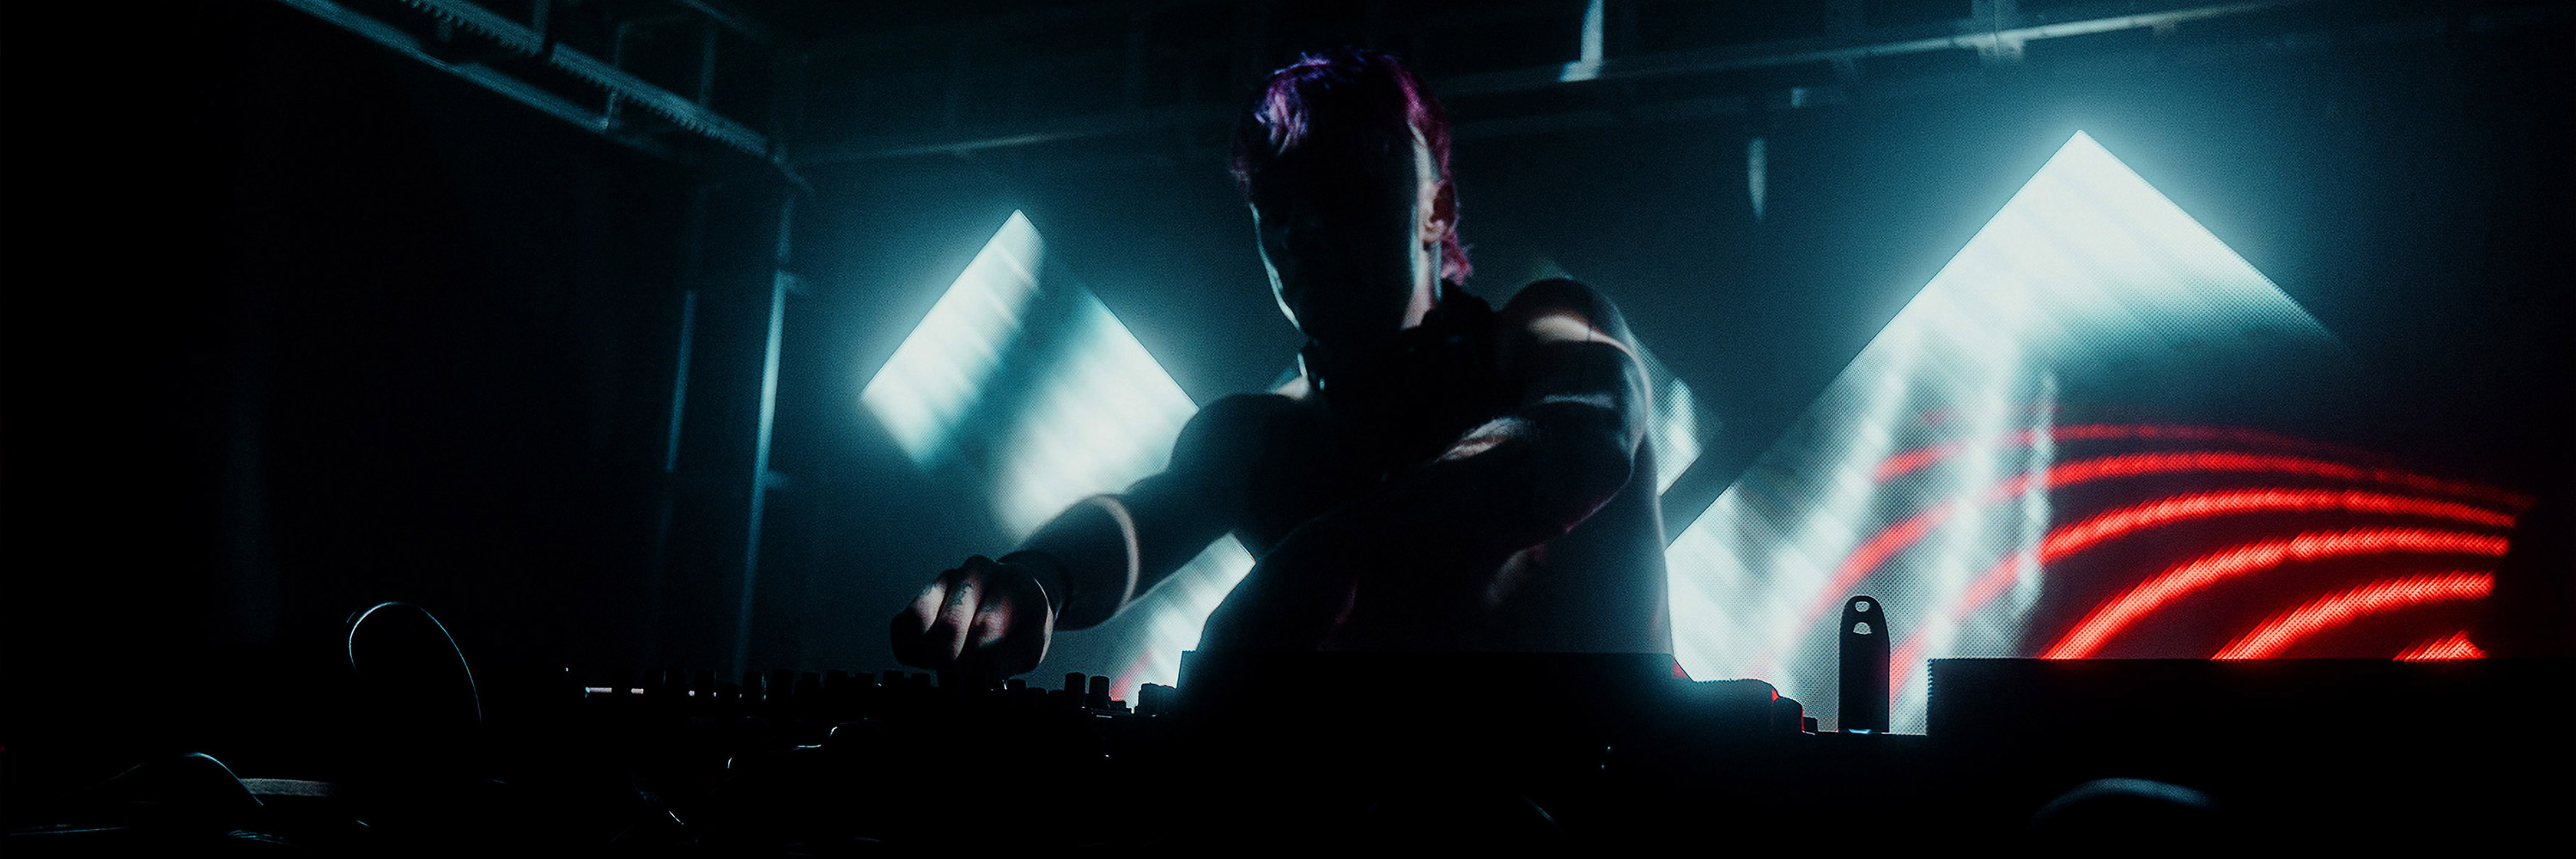
Syncing it Up with Koan Sound
No show, these days, is about just the artist or the music or the visuals or the lights. What defines a great show is how all these different facets tie up together. It’s about skillfully intertwining the audio with the visuals, the lights with the sounds, the music with the mood. I like to imagine it as blurring the lines. In the most subtle and tasteful way. Presenting a full and complete piece to the audience. And what better way to do this, than with sync?
Ah sync. An artist’s sweetest dream & worst nightmare. Get it right and the lines are skillfully indistinct. Get it wrong and the lines are all you see.
[fold][/fold]
Now, you must know that not a day goes by when the elves at the Resolume HQ don’t think about sync. You see, Resolume is not just an enabler for VJs to perform cool tricks. The bigger picture is constantly at the back of everyone’s mind. And then somewhere along the road, good people like Leggy come along. And make it all worth it. When you use MIDI & SMPTE & ArtNet Merge at the same time, in the same show, its gotta be real juicy. We're thinking, “Dinner is served” :)
Kyle Roberts (aka Leggy aka mushpongo ) has been working hard at creating content, making edits & running all the video related stuff for Koan Sound and their latest project “Polychrome”. Apart from having the coolest nick name ever, we really like him coz he introduced Jim & Will (Koan Sound) to Resolume. And, before we knew it, their whole new show depended on it.
We caught up with Leggy & Jim + Will to talk to us about their new show.
First things first, tell us how you got into this world of visuals, Leggy.
My dad is an avid photographer/videographer so I was lucky enough to have access to a camcorder when I was young. I ended up making short films with whatever I could find round the house and then editing them on a single VHS deck.
After that I focused on music studying Music Technology at University; that’s where I was first introduced to After Effects which reignited my interest in visuals. During that time period both ‘WarpVision’ and ‘The Work of Director Chris Cunningham’ DVD’s were watched in heavy rotation so videos like Gantz Graf and Monkey Drummer influenced me. Regularly visiting Bristol also had a major impact as it’s where I first witnessed projection mapping within the context of club via the ANTIVJ collective.
I knew mapping/lighting was something I wanted to focus on and over the years I’ve thankfully landed work at various festivals including Glastonbury and Boomtown where I could explore this.
Working with KOAN Sound was a pleasure as I’ve been a fan of theirs for some time. As soon as I heard Polychrome it was clear they had put a massive amount of effort in to all aspects of the album including artwork so I was ecstatic to be asked to help out with content dedicated for the Live show.
Awesome. Tell us about Polychrome and how is it different from what you have done in the past.
KOAN:
In the past we’d displayed visuals whilst we were performing, but they were never linked to the music in any meaningful way. This show was all about showcasing visuals that were very closely tied to the music.
We’d been exploring macro photography to create all of the artwork for the album, and we wanted to take that one step further and experiment with creating visuals using the same technique.
From there we assembled a small team of visual artists and animators, and began to create a video for each of the audio tracks. It was a very hands-on process, and really fun to be involved so heavily with both the creative and technical side of the show.
It’s interesting how you’re from a music production background & so find many similarities between Ableton & Resolume. What are the similarities do you see & what makes Resolume so easy to use by producers?
LEGGY:
Anyone who’s looked at the Session view within Ableton will recognize the layout of Resolume. Coupled with the drag and drop nature of both bits of software I think the learning curve compared to other visual software is rather gentle. In more ‘traditional’ DAW’s you would go through sub menus on each channel to allocate effects etc, within Ableton and Resolume you just drag them wherever you need them which encourages experimentation straight away. Also, the envelopes you can allocate to parameters introduced in Resolume 6 are visually similar to LFOs/Envelopes within popular workstation synths such as Massive and Serum, anyone familiar with them will quickly work out how they can be used.
KOAN:
We very quickly found parallels between Ableton and Resolume, in their ease of use, flexibility and workflow. Using Ableton’s MIDI envelopes to control Resolume was a revelation to us, and being able to program everything in real-time felt a lot like making music. Having the ability to tweak any number of visual parameters using automation inside Ableton is very powerful, and is similar to our process when working with just audio.
Let’s talk about Koan Sound’s new setup- from design to reality.
LEGGY:
The setup used for the live performance was conceived and designed by Tim Smith. When the team first met up to discuss plans it became apparent that KOAN wanted to be ‘surrounded’ by the visuals so Tim drew up some ideas for curved/angled LED screens that sat behind the performers and we all agreed it was the right direction to go in.
Using Grandma2 OnPC, Ma3d and a simple video to CITP converter, we were able to pre vis the designs and collaborate on the final piece.
Lighting wise we wanted to be able to have an either-or situation, video only or lights only so the entire show wasn’t solely content focused.
Tim picked GLP X4 Bar 20s that sat above and below the video wall, Robe Pointes placed in between the gaps of the LED screen and stage right and left in order to highlight KOAN and finally SGM RGB strobes placed on and behind the structure to add some depth.
Regarding touring the plan is to have three tiers of stage design all based on Tims original setup that we can alter depending on the venue but FOH and routing will stay the same.
Tell us about the routing & the hardware for the show.
You have a FOH (Resolume) Laptop, a stage laptop and a playback laptop?
KOAN:
The stage laptop is sending MIDI note and CC data to the FOH laptop over network, in addition to MIDI from the instruments on stage.
LEGGY:
The stage laptop is responsible for MIDI both in terms of VST playback in Ableton and sending data to alter parameters/trigger layers in the dedicated Resolume laptop at FOH. As KOAN could ‘play’ the visuals alongside their instruments it made sense to have a separate playback laptop to ensure a smooth show in case anything went awry, something Jon Savage, our experienced production and tour manager made sure of.
In terms of the hardware:
Stage: Macbook
Playback: Macbook
Resolume: GTX1080 MaxQ equipped W10 laptop
All of these laptops (alongside the GrandMA2) where connected via a network switch sending MIDI over LAN with the playback sending a separate LTC track over a stage box to the GrandMA2.
I hear that you are big on masks. I, personally, love the endless potential they provide. Tell us how you use them in your show.
KOAN:
When we were putting together the Arena composition it seemed like the easiest way to lay everything out was to use one deck per song, so that each track in the set had its own specific overlay and effect clips that could be independently adjusted.
In addition to selecting the deck with a note message at the start of each song, MIDI data is used to trigger masks and effects, as well as control a variety of parameters such as opacity, clip speed and start point.
The masks were also a way for us to showcase animations we’d made ourselves. Jim used Max/MSP/Jitter and Processing to create the overlays, rendering out lots of longer generative clips in high contrast. To make the show different every time, our generative masks run in the background, and by using a video router clip on a layer above, we found a way to trigger an opacity envelope on the mask without re-triggering the clip itself.
You also work with Artnet merge? It is such a great tool. It’s great to see more people use it to achieve sync between lighting & video.
LEGGY:
We actually tested the Artnet merge last but it proved one of the easiest things to get going!
I created the X4’s within the fixture editor:
And, placed them along the top and bottom of the main output (around 20 pix in height) matching their position on stage.
The merge was done at the Artnet node using a HTP setup and a trigger channel on the MA to activate/deactivate the merge. This meant Tim could control brightness, pan, tilt and zoom of the X4’s whilst Resolume dealt with the mapping. We essentially extended the screen upwards and it added so much depth to the content.
We did hit some rather large delay when activating the merge but we put that down to the Artnet Node used.
Good to know that ArtNet Merge is not that complex.
Let’s talk about all that juicy content now. Obviously, you had multiple visual artists working on the show?
KOAN:
Yes we did. The team at KōLAB Studios (Sarah Koury, Alastair Brookes and Khali Ackford) used watercolor paints with various other fluids and materials to create abstract forms and movement. We used a Sony a7R III with a 90mm 2.8 macro lens to film everything at 120fps, and experimented with different lighting setups. Our friend Loz Blackwell then used this footage to map displacement of the album artwork. After Effects was used to synchronously time remap and transform a host of macro shots, using this as a displacement map to then apply to the artwork stills. Working with such high resolution photographs enabled the cropping and selection of different sections to match the motion of the underlying visuals.
In addition, the team at BEAMA Visuals (Ben Leonard, Leigh Powless and Logan Anderson) played a big role in the content generation. They come from a range of arts backgrounds (animation, painting, graphic design respectively) and each brought their unique take to the project.
Ben wanted to recreate the complexities of natural systems in a digital space, using Cinema 4D and X-Particles in order to achieve organic growth and fluid dynamics.
For Leigh the project offered the perfect opportunity to merge digital with analog, and she crafted much of her content by hand, mixing different pigments and additives to create organic patterns of color which were then brought into After Effects to be digitally manipulated and finished. "I was trying to create visuals that were sort of living, breathing paintings, playing with symmetry and rorschach style imagery to invoke a dreamy, surreal response in the audience."
LEGGY:
My main duty content wise were visuals for the non-Polychrome songs that showcased KOANs back catalog so I wanted to create visuals that sat apart from the albums dedicated content but didn’t appear jarring.
Some of KOANs earlier work is more dancefloor focused so it gave me a chance to use some bold colours and quick edits.
The whole team shared a spreadsheet where we divided up the workload and decided what colour schemes each track should adhere to, this workflow meant we could maintain fluidity throughout the whole show.Visuals were mainly created within After Effects using the sound to keyframe tool to trigger effect parameters and layer opacities. KOAN rendered out separate stems (Bass Drum, Snare and Bass) to allocate different parameter changes to each resulting in tight visuals.
I also used C4D and Octane to create loops which were then manipulated in After Effects to create this bright warped shapes which KOAN liked the look of and I used this technique on a few songs.
So cool. We love it. The content is beautiful.
Tell us your favorite bits of the show. What do you love, what didn’t really work out?
KOAN:
We’d been relying on master tempo automation as a way of keeping everything on the grid in our onstage Ableton project, and using the Link protocol to sync the clocks of the two laptops. It had proven stable in the lead-up to the shows, but during one of the final rehearsals we discovered that these changes in tempo were causing the playback and LTC audio tracks to glitch.
We weren’t fully sure about the technical reasons for this, but thought it might have been because of the playback cursor on the synced laptop not moving smoothly through the changes in tempo, therefore causing the LTC being read by the media server and lighting desk to jump around. We had to completely scrap the tempo automation and manually move everything off of the grid in Ableton, which took ages!
LEGGY:
The crowd at the show were so energetic, definitely a pleasure to watch people react to all the hard work the team put in.
[video]https://www.youtube.com/watch?v=UTbu2QfjUvE&feature=youtu.be[/video]
The main issue for me was the dreaded ‘Optimus’ that cropped up on our Resolume laptop due to the inability to turn it off via BIOS. I had to use the workaround of creating the external display (in this case our LED wall) as the main display and everything ran smoothly after that.
Finally, we love how you’ve used all the different features Resolume has to offer to make your show. Talk to us about your favorite features. Is there anything you would like to see developed/worked upon?
KOAN:
The envelopes inside Resolume are amazing. It’s great being able to finely control any number of parameters, plus all of the different easing functions are really cool. Also how easy it is to repurpose content, by adding effects and quickly mirroring and inverting clips, as well as changing things like speed and scale.
LEGGY:
The updates in 6 have been a pleasure to explore, mainly the envelopes and modular re-design to be able to alter your workspace. I’ve also used the DMX output intensely over the years running full lighting and visual shows from a single laptop; using simple animations you can come up with bpm synced chases that would take an age to program! In terms of future updates I would love to see the inclusion of basic 3D modeling and lighting.
Thank you for doing this interview, you guys.
Polychrome looks beautiful and we can’t wait to catch it live.
Meanwhile, give the album a listen here.
CREDITS:
All photo credits: "Sarah Koury / KōLAB Studios"
BEAMA
KōLAB Studios
Loz Visuals
Mushpongo
Resolume Blog
This blog is about Resolume, VJ-ing and the inspiring things the Resolume users make. Do you have something interesting to show the community? Send in your work!
Highlights
Footage Releases by Ghosteam, Luminator and Laak
Ghosteam is teaching us a lesson with every new pack he's making.
Get Grid by Ghosteam
With LuRays, the light within will guide your vj-ing sets.
Get LuRays by Luminator
Hand is a minimal pack of loops that will rightly compliment your set.
Get Hand by Laak
Get Grid by Ghosteam
With LuRays, the light within will guide your vj-ing sets.
Get LuRays by Luminator
Hand is a minimal pack of loops that will rightly compliment your set.
Get Hand by Laak
Resolume 6.1.3: The Enchanted Princess
The 6.1.3 update has enchantment galore. We worked on stability and ease of use, but above all, we used our magic powers to make Resolume more beautiful, more elegant and more enchanting. She now feels like the princess she deserves to be, and we're sure you will too.
Cinderella Decklink
Blackmagic devices are the princesses of video. So much so, that after dancing at the ball for more than 24 hours, the output would freeze and need to be reset. We now make sure that Cinderella doesn't turn into a pumpkin and is home in time to do her chores.
Out of the Dark (Into the Light)
Alley would start up with a completely black interface on laptops with both an integrated and dedicated GPU, unless you explicitly told it to use the dedicated GPU. Not a showstopper, but definitely annoying, so we now set the GPU for you.
Radial and Linear Cloner effects
These were two very popular plugins by Hive8 back in the Resolume 5 days and a lot of you were requesting 64 bit updates for Resolume 6. So we took their basic premise, very literally added our own twist and made them native Resolume effects. Thanks very much to Anton Hive8 for letting us use his idea and to STV in Motion for the moral support and preset making.
今日のVJブース
Just like the manual, the Resolume GUI and Help are now also available in Japanese. すごい!
Now go fit your glass slipper on that download or check the full fix list below.
10508 Possible crash crash resizing GUI
11066 Load capture sources with a sensible resolution
11334 Launching selected clips with Enter works only once
11970 Alley UI is black on some laptops
12021 WMV files rendered semi transparent in Alley
12054 Text animator Rotation is displayed as radians
12059 NDI output is black when composition is bypassed
12068 Crash when opening Avermedia cn311-h capture source
12083 Update to NDI 3.8
12109 28.77 FPS DXV2 file shows and plays as 6000FPS
12111 Avi with RAW UYVY codec plays in Alley with a wrong duration
12127 Text animator doesn't show whitespace at start of a line
12139 Fit/Fill/Stretch is not part of preset in Alley
12147 Shift RGB no worky when animated in Zoom mode
12153 Alley crashes when Startup Screen is visible and nudge shortcuts are used
12168 Radial and Linear Cloner effects
12186 Crash selecting audio input device, when the previous device had more channels
12251 Japanese GUI & Help Translation
12331 Transform Position Y Start Stop range doesn't follow composition size
12374 Decklink outputs freeze after 24 hours
12376 Crash in Advanced Screen setup doing undo-redo
Footage Releases by Micah Buzan, Kev Zhu and Julius Horsthuis
Fresh faces, fresh footage, fresh life!
Michah Buzan has been making waves with his unique style of animation and we're very proud to welcome him as an artist on the Resolume footage label!
Get Morphoholgy by Micah Buzan
Kev Zhu is another new face and his first pack Luquiform takes particle systems to a whole other level.
Get Luquiform by Kev Zhu
And Julius Horsthuis is a familiar face by now. That doesn't mean his work is not jaw droppingly amazing as always.
Get BlueSpace by Julius Horsthuis
Footage Releases by Ghosteam, Daniel Knight and Data Ghost
This time we welcome a new artist on the footage label. Data Ghost is a Motion Graphic Designer and VJ based in Milan. His first pack HyperLines is juicy and meaty. After a long period of silence, we also welcome back Daniel Knight. His pack Structures was well worth the wait. And Ghosteam is always welcome. His pack Unter is jaw droppingly beautiful as always.
Get Unter by Ghosteam
More real than real
Get Structures by Daniel Knight
A modern twist on the classic style of black and white visuals
Get HyperLines by Data Ghost
Juicy and meaty colorful pack of loops
Get Unter by Ghosteam
More real than real
Get Structures by Daniel Knight
A modern twist on the classic style of black and white visuals
Get HyperLines by Data Ghost
Juicy and meaty colorful pack of loops
Resolume 6.1.2: There were tears. There was blood
Today, we release Resolume 6.1.2 into the wild. It wasn't easy. There were tears. There was blood. Most of all, there was love. Take care of her. She's special.
GIF Playback Hotfix rev 62522
Two steps forward, one step back. GIF playback was boken in the innitial 6.1.2 release. If you need this then please update once more.
"How many times do I have to kill you before you die?"
When you remove an unwanted layer in one deck, Resolume will no longer bring it back from the dead when you switch to a different deck. Unless you had content in it of course.
Apparently, this type of file also exists
When you have a hammer, everything is a nail. And when we released Alley, of course you tried to convert every possible file format under the sun. We tackled a lot of edge cases with some of the more exotic codecs and containers.
I am Denon Prime, leader of the Autobots
Resolume is now compatible with the Denon Prime 4 series, the slick new mobile mixer/player combo recently announced. While we were at it, we made clip triggering of Denon linked clips even more robust. Also, I snuck in yet another Transformers reference in the release notes.
Le singe est sur la branche
Thanks to Emeric Delavaud, Resolume now speaks French as well.
Check out the full fix list below or double tap that download.
[fold][/fold]
11048 Text block launches on restart-reopen, with parameter values uninitialized
11148 ND4 HAP files playing distorted
11232 Aja U-tap HDMI doesn't list all available formats
11245 Can't remove empty layers (anymore), deck switch always recreates them
11322 Possible appcrash duplicating groups
11504 Transitioning to a clip with overridden blend mode worky weirdy
11550 duplicating AV file/clip can make clip beat count change
11606 ASS BMD output sometimes not initializing with saved settings on Resolume restart
11660 Denon clip doesn't launch again if clip was ejected before, and the offset of the clip is smaller than the deck position
11715 Magewell XI100DUSB-HDMI only lists 60HZ progressive formats
11741 Multiple clips are not launched when receiving note on for them at the same time with Free Layer target
11770 Composition dashboard fold state not saved correctly
11777 Relocating a single file takes very long in large compositions
11906 "Column" is not translated any more if you set a color for the column
11944 here show it djhpow
11947 Possible memory leak playing avi file with ADPCM audio
11953 Audio cracks in AAC files converted with Alley
11961 Alley can't load tiff image sequences containing uint16 data
11965 Layers and columns can get messed up after Collect with update current composition.
11966 MM relocating single file to a file with a different name doesn't work
11968 MIDI velocity output no worky for selected layer clip triggers
11978 Alley is not code signed properly?
11981 Scroll layers and clips into view not working for groups
11983 Midi clock start/stop not effective
11990 AudioFormatReaderFFMPEG fails at AAC
11995 Converting image sequences can fail when folder contains metadata files
12008 Deck select shortcuts move with the decks
12011 Tempo controls repeat action when mapped to DMX and channel value changes to !=0
12042 Thumbnail loaded from file is not keeping aspect ratio.
12044 Crash trying to convert mp4 with lots of metadata
12071 DXV playback is jumpy in AE CC2019
12073 PNG with 'Gray' colorspace and Alpha channel shows white when played and yellow X as thumbnail
12078 Some shortcut types for dropdowns no worky
12107 Denon Prime 4 compatibility
12130 Possible crash with Denon switching from a linked to an unlinked song
12134 French Interface Translation (by Emeric Delavaud)
12140 Possible crash when changing envelope preset
Footage Releases by Dumb Robot, Chromosoom and Artificially Awake
The secret to a good show is all about the communication between the light technician and the VJ. Who are we kidding? You are the artist. Take these packs and forget about the lighting guy 😉
Get Alien by Dumb Robot
The pyramids, aliens! Crop circles, aliens!
Get LiquidLightning by Chromosoom
The lightning that enlightens!
Get FloodLight by Artificially Awake
It's all about the light. And shadows.
PS We love you, lighting guy. And lighting girl. We're all artists here.
Get Alien by Dumb Robot
The pyramids, aliens! Crop circles, aliens!
Get LiquidLightning by Chromosoom
The lightning that enlightens!
Get FloodLight by Artificially Awake
It's all about the light. And shadows.
PS We love you, lighting guy. And lighting girl. We're all artists here.
Merry Christmas! Enter the Resolume User Survey & Win an Akai APC40 MIDI Controller
2018 is coming to an end. And the end of a year is usually a time where we look back at what happened and think about the things we would like to do next year.
2018 was an excellent year for us. We focussed mainly on version 6 and getting her in the best shape she can be. So we released many updates that included a lot of bug fixes and improvements.
We’re really quite happy with where version 6 is at the moment. Next year we’re obviously going to continue working on keeping it that way. But at the same time, we're going to shift the focus a bit to new features again. We have a lot of what we think are great ideas. In the end, you're the ones out there every weekend using Resolume, so we’d like to know exactly what you're still struggling with, what we should build next and what we can improve upon.
We have created a survey so you can contemplate how the past year's been for you, and let us know where you want Resolume to take you next year.
[s]Enter Resolume User Survey[/s] The survey is closed and we'll contact the lucky APC winner via mail.
As a reward for taking the time to enter the Resolume survey, we’re going to raffle one Akai APC40 MK2 among the entries, kindly donated by Akai. We think the APC40 is the best controller for Resolume. So if you do not win one, you should go out and buy yourself one as a Christmas gift. We're including a decksaver to make that bad boy backpack travel proof.
That’s it from us for this year, have a very Merry Christmas, enjoy your new year's gig and we’ll see you next year!
Keepin’ It Cool with Comix
Over the past decade, the Comix crew has been making such great content, it is almost comical. A multimedia company specializing in live events, interactive design, motion graphics & film, they have worked with almost everyone in the dance music industry.
From Avicii to Alesso to Kygo to DJ Snake to Axwell Ingrosso to Swedish House Mafia, the list is a bit endless. [fold][/fold]
I especially love all the different visual styles & looks they play with. It’s amazing how much variety there is. So, of course, we caught up with Comix to talk about their art, journey and other cool things.
Tell us how this journey began.
Harry Bird (Founder/Director):
Growing up my father owned a nightclub in the South of England, the way he used lighting and projectors always interested me. He got a lot of influence from the Velvet Underground, one of the first groups to use projectors at their shows, and I guess his interest rubbed off on me.
I did a foundation course in arts and design then followed on to do a Degree in Interactive Media at The Arts Institute at Bournemouth. While here I DJ’d for club nights and begun promoting my own nights. VJing caught my eye as it begun to slowly take off during these years and I decided to investigate this further and find out more.
I was on the same course with Sam Hodgkiss (Co-founder of Comix) and fortunate enough to meet the foundation of our talented team at University while studying Interactive Media, this combination and utilization of skill sets I believe was key to our success.
After University, and many VJ nights later, Sam and myself managed to get a gig going on a UK bus tour with Radio 1 DJ Kissy Sell Out. In 2010, We supported an act at Brixton Academy called “Swedish House Mafia” - after the show SHM contacted us and asked us to come along to VJ their headline EDC LA show, obviously we said yes!
And the rest is history, eh?
When I look at your work, what I love the most is how dark it is. You do a great job mixing that in with the EDM flavor. Would you say this is your style? Or are you just working at what feels right for the artist?
Tom Brightman (Comix Creative Director):
I would say that it’s a mix of the two. Our main goal when working with a client on new show content is to deliver them the show that they want, inevitably during the creative process some of our individual creative styles come out in the finished work.
A lot of people come to us as they’ve seen another show that we’ve produced and want something with a similar tone, which is great as it’s obviously a visual area we enjoy working in.
However, others approach us as they’ve heard we are good to work with, or trust in our professionalism given the number of high-end clients we have worked with, and they may want something totally different to our usual style, which is also great as it can present a bigger challenge and may result in us having to learn new techniques, software or hardware.
It’s the reason that we use specific designers for specific jobs, if we want to produce the best work it’s a good idea to utilize designer’s particular strengths.
Alongside a lot of our more well-known shows like Alesso and Avicii we have also produced more upbeat visuals, such as the love story we created for the recent Kygo’s Live ‘Kids in Love Tour’ or hand drawn animations we’ve previously made for The Chainsmokers.
It’s always great to work in these alternative styles as it keeps us on our toes!
With so many artists you cater to, how do you ensure something fresh for each one of them?
Tom:
From the start of each project we aim to establish a unique visual language for each client independently from one another. Most of us in the studio know the main bulk of our content, which allows us to alter any ideas that may appear similar to another clients. It’s very important to us to not imitate work from another artist, or any other shows, especially as we have a large group of clients in a similar genre.
The creative process itself tends to do away with much need for that as we are creating unique projects for individual clients, based on their specific tastes, music styles, ideas and requirements.
On top of this process generally every client has their own visuals operator, usually provided by us, who will lend their own style to the show, especially as the show organically evolves on the road after rehearsals.
Tell us about your content creation process- from scratch to final render. What all software do you work with?
We are often as open-minded as possible when approaching a new project, never really having the final outcome or process in our head, to a degree. The exception to this rule may be a project that is extremely time or budget sensitive.
When designing a show, we usually begin thinking of the bigger picture; What’s the overall visual language (colours, textures, symbols, film/CGI/mixed, etc.)? What theme wants to be communicated and carried throughout the show? What restrictions do we have? And so on.
After we begin to get a sense of what’s working and what’s not, we will start to move on to individual looks for songs, forming a mood board with a few routes for the client to choose from which we can develop further on.
Alongside this process, we will begin to think a bit about how we are going to produce it, but the level of that thought process varies massively. It’s more important that the client is happy with the core ideas, and as long as we have a rough idea of how we may translate the looks from paper to screen, then we will figure the rest out later. It’s worked out well for us to let the creative evolve in its right and not be too restricted by process.
After that it’s probably a similar process to most productions, we work out if we need to film anything, if we need any research and development days, then we begin any CGI process.
There’s always some technique, hardware or software that we need to learn to complete a job (in the office or on the road), but for us it’s not only interesting but rewarding to be able to learn something new, and as a company we’re lucky to have a team of friendly, clever and competent people capable of standing up to that challenge.
Software wise the list could be endless! Pre- production often involves a lot of drawing, post-it notes and Adobe InDesign for mood boarding.
During production we mostly use Cinema 4D, X-Particles, Octane Renderer, Houdini and Adobe After Effects.
Then for touring live we obviously use Resolume, which takes care of pixel-mapping, inputs, outputs and playback.
Alongside After Effects, Resolume really has been the tool that we have used and loved since day 1 of Comix and I couldn’t see us changing that any time soon, especially with some of the great features that came out in version 6 and the support you guys give to the community.
Cheers to that!
Tell us a bit about the kind of prep that goes into playing massive stages.
Sam Hodgkiss:
Every show is different, but I’ll talk about a show like Ultra Miami.
This show is unique in that a lot of our clients like to use it to launch their new visual and lighting show here which will normally be toured throughout the festival season in the summer, sometimes with a few additional updates.
We would start by looking back over the previous show with the client and working out how much new content they would like to add. This can range from a few updates if the content is fairly new, to an entirely new show and direction.
If everything goes well, and there’s always a few complications, we will get a stage design and pixel map in advance of the show. At this point depending on time and budget, we would look at creating custom content specifically designed to take advantage of the stage design, add any unique moments and do what we can to make this show feel different.
Once all that is complete, minus the usual last-minute amendments, we head into rehearsals. That’s when the fun part begins, sitting with the client and lighting operator and building the show.
Again, depending on time and budget this can vary from a small previz studio to having the entire stage built in a rehearsal warehouse.
This is where Resolume Arena can shine.
It allows us to keep the show organized, make changes quickly, drag and drop clips, add effects and colour corrections right in front of the client. And if there are any last-minute changes to the stage design or pixel map, Advance Mapper makes it easy to fix and adapt the final output with minimal re-rendering.
And, what hardware do you guys work with?
Sam:
Unlike traditional touring, with most DJs we don’t have trucks to transport large case’s, and sometimes fly in hot straight to stage at shows ranging from small clubs to large arenas. So, in that respect everything needs to be as portable as possible and with no compromise. Below is a list of essentials:
● High end show laptop with a minimum Nvidia 1070. A lot of new festivals now have dual 4k outputs and the 1070 allows playback at 60fps with no frame drops.
● A second identical laptop as a backup, also used to create content on the road.
● Midi controller of choice with backup, this is always personal preference
● Every video adapter under the planet with spares, these things always seem to go missing.
As every show is different, we also have some more specialized equipment for example:
● Datapath Fx4’s for those shows that love 4+ outputs
● Multi-camera rigs. A few of our clients incorporate live cameras into their set to add an extra layer to the live show
● And the camera rig is accompanied by Capture cards, Roland video mixers and preview monitors among other things.
● External Sound cards if audio input or output is needed
A new addition the some of our shows is a Notch Rig. This allows is to incorporate some really cool camera overlays and generative content live into the show.
When we are lucky enough to have a truck tour or we need the extra power at larger show, Coachella main stage for example, we have video server racks that can really push those extra pixels and outputs.
Tell us about your studio- where all that Comix magic is created.
Tom:
We have recently expanded our studio to accommodate for the greater variety in work we now produce and to accommodate our growing list of talented employees. Now, with one studio concentrating on post production and CGI, and the other as a live film, rehearsal space and test area for interactive work.
Rig wise in the studio we all use PC towers running Windows with at least two graphics cards (NVidia 1080ti + Titan’s), a decent amount of ram (32-64GB) and a good processor (Intel i7/i9), then tonnes of storage on a server for resources and backups. We also have render node’s with NVidia 1080ti graphics cards for when the 3D work needs extra muscle thrown at it. It’s also great if you need an extra heater in the office!
Haha! What are your favorite bit of content/ shows that you’ve created?
Harry: Every Avicii show I VJ’d over 6 years touring with him is now a memory I’ll never forget.
Sam: Swedish House Mafia’s One Last Tour. After being on the road for 6 months with the guys and a really amazing crew it felt like a family. Being lucky enough to travel around the world getting up every day to perform this massive show will never be forgotten. It was a truly great send off.
And finally, any words of advice for budding visual artists out there?
Harry:
LOL. Thanks for the great interview and work, guys.
You are quite the c̶o̶m̶i̶c̶s̶ comix, yourselves :)
50% Black Friday Discount [SALE ENDED]
The sale has ended and again we're very grateful to welcome so many new people to the Resolume Family. Welcome, and enjoy Resolume everybody! Checkout the free training videos to learn how to get the most out of your shiny new Resolume.
[s]Alright, it’s that time of the year again. The Traditional Resolume 50% Black Friday Discount. Ooh and pumpkin pie, turkey, cheese grits, brussels sprouts and gravy if you’re from the USA.[/s]
This weekend we offer 50% discount on our software, footage and even our t-shirts, so you’ll have something nice to wear to your next gig. The discount also applies to upgrades and educational licenses and it ends after Cyber Monday. Remember that this is the only sale we ever do so get it while it’s cheap. Shop Now!
So about that thanksgiving dinner. If you’d like to perfect your gravy then checkout this recipe from Jamie Oliver. That looks delicious :-)